
Underwear Inspection Checklist: Sample Size, Sequence and AQL Level
An underwear inspection checklist runs from fabric and elastic through fit, stitch quality, labelling and packing. Use this sequence with the sample sizes that make it…
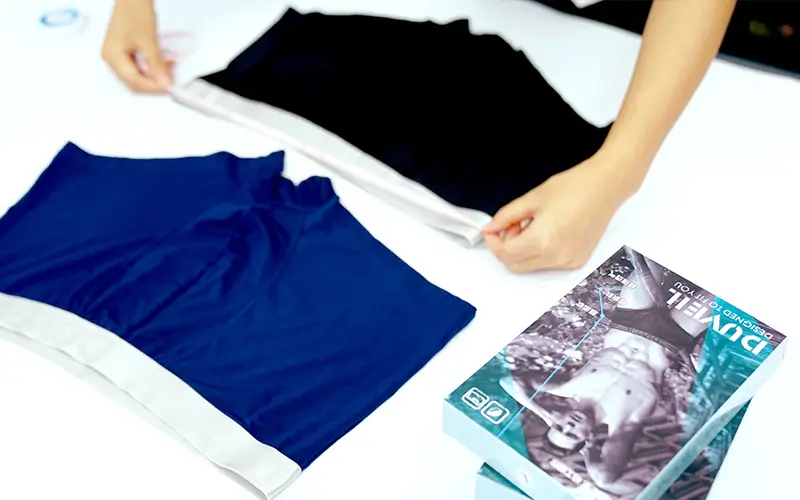
An underwear inspection is only as good as its order and its sample size. Check things in the sequence they are built and faults become traceable; draw the sample properly and the result means something about the whole order. This checklist covers both, from fabric and elastic through to the carton seal.
Inspect in order: materials, construction, fit, branding, packing
Follow the order the garment is built in.
Inspecting in build order makes a finding traceable to a stage, and it stops an inspector from spending the whole sample on the most visible fault instead of the most consequential one.
The sequence runs from materials through construction, then fit and measurement, then branding and labelling, then packing and carton. It mirrors the production stages, so a defect found at a later step can be traced back to the earlier one that produced it. It also front-loads the checks that matter most: fabric and elastic decide most of what a customer experiences, while packing matters only if everything before it has passed. An inspection conducted in a different order tends to produce a list of findings with no structure, which is difficult to remedy because it is not obvious which production step each item belongs to.
Fabric and elastic checks
Verify the inputs against the approved sample.
Fabric and elastic are the two inputs that decide how the garment feels and how long it lasts, and both should be checked against the approved standard rather than against a description.
For fabric, check the composition against the specification, the weight in grams per square metre, the shade against the approved colour standard and the surface for holes, slubs, oil marks and needle lines. Shade is worth checking on cut pieces rather than on the roll, because a variation that is invisible on a full width can become obvious when panels are joined. For elastic, check the width, the stretch and the recovery against the approved sample, and check the surface for the finish that was specified. Elastic is the component most often substituted when stock runs short, so the inspection should compare the elastic in the order against the approved sample physically rather than accept a written confirmation. Where a substitution is found, it should be recorded before any further work is done.
Stitch and seam integrity
Test the seams rather than look at them.
Seam integrity is checked by pulling, stretching and inspecting the stitch formation, because a seam that looks correct on a flat garment can fail as soon as it is worn under tension.
On underwear the seams under the most load are the waist attachment, the side seams and the gusset join. The checks worth performing are a stretch test on the elastic attachment, a pull test on the gusset seams, and a visual check of the stitch formation for skipped stitches, dropped stitches and seam slippage. On a knit fabric, the stitch has to stretch with the material, so a seam that has been sewn with a stitch that does not elongate will fail at the point of maximum stretch rather than at the seam end. The inspector should also check the seam ends, because an unsecured thread at the end of a seam will unravel after a few washes and is one of the most common complaints on a low-cost garment.
Measurement verification on the block points
Measure the points that define the fit.
Measurement verification compares the garment against the specification at the points that control fit, and on underwear those points should be defined before the inspection rather than chosen during it.
The measurements that matter on a brief are the relaxed waist, the stretched waist, the side seam length, the leg opening and the front and back rise. On a boxer brief, the leg length and the leg opening become more consequential because the fit is longer and the elastic carries more tension. The inspector should measure the relaxed and stretched versions of the waist separately, because a waistband can sit correctly at rest and still recover poorly, and the stretched measurement is what the customer experiences when wearing it. Where the garment is a knit, the inspection should record whether the measurement was taken before or after washing, since the two figures differ and a specification that does not state which is quoted allows both parties to be correct.
Waistband and leg elastic behaviour
Recovery matters more than the measurement at rest.
Elastic behaviour is tested by stretching the band, holding it and checking how it returns, and by washing the garment and checking whether the band has rippled, rolled or lost height.
The fault to look for first is uneven tension, which appears as a wavy waistband or a hem that rolls along part of its length. It is produced when the elastic is attached with inconsistent stretch across the attachment, and it cannot be corrected after the garment is sewn. The second fault is loss of recovery, which shows up after laundering rather than before and is the reason a washed sample belongs in the inspection. The third is a band that has been attached under too much tension, which produces a gathered look at rest and a tight feel in wear. All three are visible in a small sample if the inspector knows to look, and all three are invisible in a pressed sample photographed in a studio.
Label, care mark and branding checks
Check that the label matches the garment it is on.
Labelling is a compliance check rather than a branding check, and the content and care information has to be permanent, legible and correct for the market where the goods will be sold.
The checks are whether the fibre content on the label matches the fabric actually used, whether the care instructions are appropriate for that fibre and that elastic, and whether the country of origin statement is present where the destination market requires it. The reason this belongs in the inspection rather than in a final review is that a label attached to a finished garment is the most expensive item to correct, because removing it can mark the fabric. Where the brand uses a woven label, a heat transfer or a printed neck tape, the inspection should also check the attachment method against the approved sample, since a transfer applied at the wrong temperature will look correct on the day and deteriorate after washing. A single mislabelled carton can hold up a whole shipment if the destination market checks.
Fit checks that catch pattern faults
Wear the sample, do not only measure it.
Fit checks catch the faults that measurement misses, particularly the pattern errors that show up as pulling, bunching or an uncomfortable rise when the garment is actually worn.
A measurement can pass at every point and the garment can still be uncomfortable, because fit depends on how the panels relate to each other rather than on any single dimension. The checks worth performing are whether the rise sits where it should, whether the gusset lies flat, whether the leg opening grips without cutting, and whether the waistband stays in place during movement. On a graded size set, the fit check should include the smallest and largest sizes rather than only the middle, because a pattern that is correct at the centre can pull at one extreme and cut in at the other. A size set that has been measured but never worn will not reveal that, which is why both checks belong in the inspection rather than one replacing the other.
Packaging and carton verification
Verify the pack and the carton against the specification.
Packaging verification covers the poly bag or box, the tag and sticker placement, the size and colour breakdown and the carton marking, and it is the stage that determines whether the receiving warehouse can put the stock away.
The checks are whether the pack format matches the approved specification, whether the size and colour sticker is correct and legible, whether the garments are folded or bagged as agreed, and whether the carton marking identifies the style, colour and size breakdown. Ask for the carton weight and dimensions against the quotation, because a carton heavier than specified can exceed a handling limit, and a carton that is bulkier than specified consumes freight. Where the goods are sold through an online channel, check that the inner pack is the one the fulfilment process expects, because a pack format that is convenient for the factory can be inconvenient for a warehouse that receives thousands of units.
Sample sizes for a meaningful inspection
Draw a random sample scaled to the lot.
The sample size should be derived from the lot size and the acceptance level rather than chosen by eye, and the pieces should be drawn from across the order rather than from one carton.
Acceptance sampling tables relate the lot size to the sample size and the number of allowed defects, and the practical consequence is that a larger lot requires a larger sample to give the same confidence. The more common failure is not the table but the drawing: an inspector who takes pieces from the cartons nearest the door has inspected one carton’s worth of production rather than the order, and a fault concentrated in an earlier or later carton will not appear. The sample should be drawn from different cartons, different bundles and, where the order has several colours or sizes, from each of them proportionally. Where the order is small, the sample should still be spread across the whole quantity, because with a small lot the difference between a random sample and a convenient one is proportionally larger.
Recording findings so they can be remedied
Record the finding, the size, the class and the quantity.
A finding becomes a remedy when it is recorded in a form the factory can act on, which means naming the defect, the quantity affected, the size and colour, and the class it falls into.
The most useful record is a short table rather than a narrative, because the factory needs to know how many pieces are affected and which operation is likely responsible. Photographs help, provided they show the defect at a scale where it is visible and include a reference for size. The record should also note which cartons or bundles were sampled, so that if a fault is found the factory can trace it to a production period rather than re-inspecting the whole order. Where the remedy is rework, the record should state the operation to be corrected and the check that confirms the correction. Where the remedy is rejection of specific pieces, the record should identify them individually, because a rejection that cannot be traced back to specific pieces tends to expand during negotiation. The acceptance-stage guide for bulk orders covers how these findings translate into an accept, rework or reject decision, and the design and specification stage is where the measurement points should have been defined in the first place.
FAQ
What should I inspect on an underwear order?
Fabric and elastic against the approved sample, stitch and seam integrity, measurement at the block points, waistband and leg elastic behaviour, labelling and branding, fit, then packaging and carton. Inspect in that order so each finding traces to a production stage.
How many pieces should I inspect in a QC check?
The number should come from the lot size and the acceptance level rather than from convenience, and the pieces should be drawn from different cartons, bundles, colours and sizes. Inspecting one carton thoroughly is not the same as sampling the order.
Why does a washed sample matter for underwear?
Because the two faults that generate most underwear complaints, loss of elastic recovery and shrinkage, only appear after laundering. A pressed sample can pass every measurement and still fail the first wash the customer performs.
What is the most common underwear inspection finding?
Uneven elastic tension, which shows as a wavy or rolled waistband or leg opening, followed by measurement drift at the extremes of the size range. Both are decided before the garment reaches final inspection.
Next step for your team: send the Finetex Global team your underwear style and size range, and ask for the inspection sequence, the sample plan and the measurement points that would apply to your order.
Sources: OEKO-TEX STANDARD 100; 16 CFR Part 303 textile labelling; ISO 9001 quality management; Better Work (ILO/IFC); FTC textile labelling guidance.
More factory-floor notes for brand owners

Sample Revision Limits: How to Control Underwear Development Cost and Calendar
A sample revision limit should control scope, not block necessary correction. The buyer and factory need to distinguish…
Read more →
Lab Dips and Strike-Offs for Underwear: Approval Steps That Prevent Delays
A lab dip approves a dyed textile shade; a strike-off approves printed artwork on the intended substrate. They…
Read more →
Color MOQ Planning: How to Share Fabric Across Multiple Underwear Styles
Color MOQ planning works best when a brand treats dyed fabric as a shared material platform rather than…
Read more →
Underwear Fabric Utilization: How Marker Efficiency Changes Unit Cost
Fabric utilization converts a fabric quotation into a garment cost. The calculation must account for pattern area, fabric…
Read more →
Open Costing for Men’s Underwear: Reading Fabric, Trim, Labor and Overhead Lines
An open-cost sheet is useful only when every line is tied to a measurable specification, a purchasing unit…
Read more →Global Apparel Sourcing Outlook 2026: Cotton, Freight and Supply-Chain Risk
A data-led 2026 apparel sourcing outlook on cotton balances, freight volatility, supplier diversification, lead time, compliance and practical…
Read more →Request a sample & pricing information
Send us your tech pack, target price or a reference sample — we reply with a quotation, a realistic lead time and a fabric recommendation within one working day.
- Free sampling plan & cost breakdown
- MOQ from 300 pcs per style
- Reply within 1 working day